

🧀🥒Ground Beef and Gruyere Zucchini Boats

This is a fun and super easy dinner that my kids love. It’s honestly one of the only ways I can get them to eat zucchini! You could use any cheese, although I’m in love with the Swiss Emmi-brand gruyere from Costco, which is raw and so delicious. Enjoy!
Ingredients:
4 large zucchinis, washed and ends cut off
2 lbs ground beef (lean for protein-sparing, or 80/20 for weight maintenance)
8 oz Gruyere, shredded
2 t dried italian seasoning
1 t onion powder
1 t garlic powder
sea salt
Instructions:
Preheat the oven to 350 degrees. Slice the zucchini lengthwise and scoop out the seedy insides with a spoon, leaving a little on the ends so the ground beef mixture doesn’t leak out during cooking. Combine the ground beef in a bowl with all of the other ingredients except the cheese and zucchinis. Place parchment paper on a cookie sheet and place all of the zucchini “boats” on the parchment, filling with the beef mixture, and covering with a layer of gruyere. Place in the oven for 30-40 minutes or until the cheese is brown and the zucchinis can be pierced easily with a fork. Enjoy!

🥩 How to Cook the Perfect Steak

Knowing how to cook the perfect steak is imperative to becoming animal-based! I love using cast iron pans for all of my kitchen cooking. Of course, nothing beats a steak on the grill, but if you want to cook your steak inside in cast iron, here is how!
Ingredients:
1 lb of steak for each person (ribeye for weight maintenance OR filet/lean sirloin/tenderloin for a protein-sparing day)
Butter for the pan
Sea salt
Optional: sprig of rosemary or sage
Instructions:
Make sure the steak is fully defrosted. It can be cold from the fridge or first brought to room temperature. Salt liberally with a high quality sea salt like Himalayan or Redmond’s Real salt on both sides. Place the cast iron pan on the burner and turn the heat to HIGH. Let the pan get good and hot for 1 minute, but not smoking. Add a small amount of butter to the pan, to just lightly cover the bottom with melted butter. Place the optional herbs in the butter, if using, and then push them off to the side of the pan. Place the salted steak in the hot pan as soon as the butter is melted but hasn’t yet browned. Turn the heat down to medium-high for a thinner steak (less than an inch), or medium for a thick steak (1.5-2 inches thick). Cook for 3-5 minutes until the bottom is nice and brown and a crust is beginning to form. Flip the steak and continue cooking on the second side and spoon some of the butter and juices from the pan back onto the steak as it cooks. You may need to continue flipping the steak every 3-5 minutes until it is done.
Optional: use a kitchen thermometer to check the internal temperature. I like to pull the steak out of the pan when the temperature is 10 degrees lower than the desired doneness because it will continue to rise about 10 more degrees. Rare is a final temp of 120, medium rare is 130, and medium is about 140. So, for medium rare, I like to cook my steak to about 120 degrees and it will continue to heat to 130 as it rests for 5-10 minutes on the cutting board. Resting also allows the juices to absorb so that they don’t run out when you cut into the steak. If you don’t have a kitchen thermometer, make a small incision in the middle of the steak in the pan to check for your desired doneness.

🍯🍋Honey Lemon Curd

Frankly, I don’t want to live a life without desserts like lemon curd. This is one of the reasons why I follow a pro-metabolic way-of-eating, and not keto. Also, eating a little honey helps with electrolytes, sleep, and muscle cramping - our ancestors ate honey and fruit. This recipe is healthy and divine, although it is fairly high-fat. But what a great treat for a refeed day!
Ingredients:
3 eggs
1/4 C honey, preferably raw
1 T butter, cut into small pieces
2 t lemon zest, finely grated
1/2 C lemon juice (about 2-3 large lemons)
dash sea salt
Instructions:
Mince the lemon zest with a food processor or a sharp knife. Cream the butter in the food processor, or use a hand mixer or whisk. Add the zest, honey, lemon juice, salt, and eggs. Mix until well combined. Pour the batter into a small saucepan and cook over low heat, whisking constantly until the curd coats the back of a spoon (just before a simmer) or reaches 165 degrees. Remove from the heat, add the butter pieces, and stir another minute. Pour into small custard cups and refrigerate until cool. Enjoy!
Photo by James Trenda on Unsplash

Swedish Meatballs

These are delicious, extremely healthy, high-protein, and can be made in 15 minutes. Serve with zucchini noodles stirred into the sauce at the end until they are warm, or sourdough pasta if you tolerate it!
Ingredients:
3 pounds lean ground beef
1 t garlic powder
1 t onion powder
3 large zucchinis, spiraled into noodles or thin sliced, or Sourdough spaghetti if you tolerated
1 C milk, preferably raw and skim
2 t sea salt, or to taste
1 egg, beaten
2 t Worcestershire sauce, optional
Instructions:
Combine raw beef, egg, and 1 t salt and form into meatballs. Brown these in a dutch oven or large cast iron pan until the outside is cooked (optional to butter the pan). Add dairy, onion powder, garlic powder, and Worcestershire sauce, if using and bring to a simmer. Place a lid on top and let the mixture simmer for 10 minutes until the meatballs are cooked through. I like to stir in the zucchini noodles just until warmed through (don’t overcook or the water will come out and make the sauce too watery). Enjoy!

Spaghetti Squash Beef Casserole
I saw someone post something similar on one of my carnivore groups this week and I immediately thought it was such a good idea! I made it right away and all 3 of my kids ate it up, so I knew it was a success!
Ingredients:
1 medium spaghetti squash
1 T melted butter
Sea salt
2 pounds ground beef
1 t garlic powder
1 t onion powder
1 C cream, preferably raw
1 C parmesan cheese
1/4 teaspoon lemon zest
1 C shredded cheese, preferably raw (I like Costco’s raw gruyere)
Instructions:
Preheat oven to 350. Cut the spaghetti squash in half lengthwise, and scoop out the seeds. Rub the melted butter all over the inside and salt liberally. Place inside-down on a cookie sheet and bake for 40 minutes. When they are cool enough, use a fork to scrape out the “spaghetti” from the squash rinds.
In a sauce pan, warm the raw cream to 120 degrees and stir in the parmesan cheese with a little salt and the lemon zest.
Brown the meat with salt, onion powder, and garlic powder.
Stir the spaghetti squash, beef, and alfredo cream sauce together in a large bowl and spread in a glass baking dish. Top with the shredded cheese and place under the oven broiler for a few minutes until the cheese is just melted. Serve and enjoy!

Salmon Poke Bowls

These are super easy, delicious, and versatile. Set out little bowls of all of the ingredients, and let your guests or family build their own! Top with tamari and pickled ginger and enjoy!
Ingredients:
Sushi-grade raw salmon, chopped
Julienned or sliced English cucumbers
Shredded carrots
Sliced avocado
Chopped mango
Chopped pineapple
Shredded nori
Wheat-free tamari sauce
Pickled ginger
White rice, if desired

Seed Oils: The Underlying Cause of Obesity and Disease
Seed oil started out as industrial machinery lubricant, and now the government is telling us it’s the healthiest food for the human body.

There is a hidden ingredient in our food that is causing obesity and common chronic diseases like diabetes and heart disease.
Although bacon cheeseburgers, carbohydrates, and sugar have traditionally been blamed for rampant obesity and metabolic disease, they are not actually the root cause. The hidden ingredient in our food—especially in almost all restaurant and processed food—doing the real damage to the human body is vegetable oil, more accurately called “seed oils.”
Seed oils are known scientifically under many names: linoleic acid, omega-6 fatty acids, and polyunsaturated fatty acids (PUFAs). Dr. Cate Shanahan, long-time nutritionist for the LA Lakers and author of Deep Nutrition, calls these oils the “Hateful Eight”—including soybean, corn, canola (rapeseed), safflower, sunflower, cottonseed, grapeseed, and rice bran oil.
None of these seed oils were historically part of the human diet. Our ancestors didn’t press oil out of soybeans or corn in the wild—in fact, humans didn’t eat grains or beans at all until relatively recently. Historically, our ancestors were hunter-gatherers who ate mostly meat and fruit. They primarily hunted large game (ruminant animals) and gathered eggs and ripe fruit. The traditional human fat sources included animal fat as well as fat from fruits like olives, avocados, and coconuts.
There are three basic types of fat: saturated, monounsaturated, and polyunsaturated. Saturated fat comes mostly from animal fats and coconut oil. Monounsaturated fats are found in fatty fruits like avocado and olive. Polyunsaturated fats are primarily found in seeds.

The 3 main kinds of dietary fat.
Saturated fat is solid at room temperature (think beef tallow and butter) because it is fully “saturated” with hydrogen, meaning it has no double bonds—so it resists bonding with oxygen and oxidizing. This allows the fat molecules to stack neatly, making them stable and solid. In contrast, mono- and polyunsaturated fats have one or more double bonds, creating “bends” in the chain that prevent them from stacking and make them liquid at room temperature.
If a fat is not fully saturated with hydrogen, oxygen can attach to those double bonds. Monounsaturated fats (with one bend) and polyunsaturated fats (with many) are therefore prone to oxidation. Oxidized fats go rancid and contribute to inflammation and disease in the human body.
The fats we eat get incorporated into our tissues. Every cell in the body has a phospholipid membrane—meaning the cell’s outer wall is made of fat. When those membranes are built from unstable polyunsaturated and monounsaturated fats, they become weak and prone to damage. This can lead to metabolic disease, including diabetes, obesity, heart disease, stroke, and cancer.

graph from optimisingnutrition.com
About a century ago, polyunsaturated fats were introduced into the food supply. It started with Crisco, a company that chemically processed cottonseed oil to market it as a “heart healthy” alternative to tallow, lard, and butter. Prior to WWI, cottonseed oil had been used to lubricate machinery. After the war, the surplus was sold to Americans as food.
Not only were seed oils introduced into human food, but they were also used in animal feed. Monogastric animals (like chickens and pigs) store the fats they eat without converting them. So, when they’re fed seed oils, we consume those stored PUFAs when we eat chicken skin or bacon.
Cows, on the other hand, are polygastric (with four stomachs) and have gut bacteria that convert even corn and seed oils into saturated fat. So, corn-fed beef still produces saturated fat–rich tallow and butter. This makes ruminant fat (from cows, lamb, bison, etc.) the safest and most stable fat for humans. In the carnivore community, we say: “Cows are king.”
Even grass-fed cows contain a small amount of PUFA—red meat has ~3% PUFA in grass-fed and ~6% in corn-fed beef, or about 3 grams in a pound of 70% lean beef. Eggs also contain around 0.5g PUFA each unless the hens are corn- and soy-free. Since red meat and eggs are some of the best foods for humans, a small amount of PUFA is unavoidable—but the goal is to keep it under 10g/day.
Unfortunately, there is rampant misinformation in the U.S. about seed oils. Many doctors and nutritionists recommend high PUFA intake based on the idea that it lowers LDL cholesterol, which they associate with heart disease. But newer, more accurate studies show that lowering cholesterol does not prevent heart disease—and can even increase the risk.
Some researchers suggest that what matters is the ratio of omega-6 (PUFA) to omega-3 fats. But this is misleading. While omega-3s (like in fish oil) are technically PUFAs too, they’re not as harmful and may have some benefits. But focusing on the ratio is a distraction. The total amount of omega-6 fats is what matters most—and that number needs to be as low as possible. These fats are toxic, bioaccumulative, and extremely slow to detox.
The half-life of linoleic acid (the primary omega-6 in seed oils) is 680 days—meaning it takes nearly two years to clear just half of what’s stored in your body. It takes 4–7 years to fully detox from decades of seed oil consumption. Since this toxin is linked to obesity, diabetes, cancer, and other diseases, we need to avoid it like the plague.
So, how do we do that?
At home, it’s simple. Throw out all vegetable oils (they’re all seed oils), and use only beef tallow, butter, coconut oil, and high-quality olive oil. Avoid the fat from chicken and pork, but you can still enjoy the protein from boneless, skinless chicken breasts, fat-free ham, or lean pork loin.
Avoid all seeds, beans, grains, and nuts—they’re packed with seed oil and other plant defense chemicals.
The harder part is restaurants. Studies show up to 40% of the calories in a typical restaurant meal come from seed oils. Everything fried, sautéed, or dressed in sauce is usually cooked in them. French fries, ranch dressing, stir-fries, sautéed onions, chicken wings—it’s all seed oil.
However, a few restaurants use beef tallow fryers (e.g., some Buffalo Wild Wings locations) or butter-based cooking. Your safest bets are steak and burgers (no bun or mayo), since those are usually grilled without added oil. Ask for butter packets or bring your own. For salads, ask for oil and vinegar and add your own dressing. Call restaurants in advance when they’re slow and kindly ask about their cooking fats.
Even some “butters” in restaurants are 50% seed oil blends. Fast food burgers, surprisingly, are often 100% beef and free from seed oils—just add tomato, pickles, onions, and mustard if you like.
In France and Italy, traditional cuisine avoids seed oils. This is part of the “French paradox”—they eat lots of fat and carbs but don’t get fat or sick like Americans. Authentic European restaurants are more likely to use real butter and animal fats, but in the U.S., always confirm.
What happens when you stop eating seed oils?
After removing seed oils and keeping PUFA intake below 10g/day, I noticed rapid improvements. Within three months, I could eat moderate carbs without gaining weight or triggering intense cravings. I felt stable and normal again—like when I was a kid.
Another benefit? No more sunburn. Many people in the carnivore and pro-metabolic communities report that eliminating seed oils makes them more resistant to sun damage*. This makes sense—our ancestors lived near the equator and were exposed to lots of sun without sunscreen or clothing. It’s not the sun causing sunburns; it’s the unstable oils in our tissues and the chemical sunscreens damaging our skin.
What should you eat instead?
The best way to heal is to eat what our ancestors ate: meat, fruit, and eggs. Fruits (technically the sweet part of the plant that holds seeds) include not just apples and oranges, but also avocado, olives, cucumbers, squash, and coconuts. Some people also tolerate cooked root vegetables like carrots and sweet potatoes. Meat and fruit don’t contain plant toxins or seed oils—and they’re what our bodies are designed to thrive on.
Beans, grains, and nuts? These are seeds, and they’re full of both PUFAs and plant toxins (gluten, lectins, oxalates, phytates, saponins, etc.). Humans aren’t designed to digest seeds—and our ancestors rarely ate them unless they were fermented or sprouted to reduce toxicity.
Even olive oil and avocado oil, while monounsaturated and lower in PUFA, are prone to oxidation if not cold-pressed and stored in dark bottles. Plus, studies show 80% of these oils on the U.S. market are adulterated with seed oils*. Thankfully, Costco’s Kirkland Signature olive oil and Chosen Foods avocado oil are among the few verified pure brands.
The food industry is not protecting you. From replacing tallow with canola in the ‘80s to allowing mislabeled oils today, there is massive fraud and corruption. But you can take back control of your health.
Start today. Throw out your seed oils. Choose beef, butter, eggs, and fruit. Bring your own butter to restaurants. Call ahead and ask about ingredients. Support restaurants that use real fats. Share this knowledge.
The benefits? You’ll lose weight, burn fat, stop sunburning, reduce cravings, and heal long-standing health issues. You’ll feel stable, energized, and in control again.
Even if you cheat and eat junk food—never eat seed oils. Just remember: it takes 680 days to clear out half.
Within 3 months of reducing PUFA to under 10g/day, I started healing and losing weight. You can too.
Additional references:
https://drcate.com/pufa-project/
https://drcate.com/category/food/seed-oils/
https://www.zeroacre.com/blog/linoleic-acid-facts
https://www.ncbi.nlm.nih.gov/pmc/articles/PMC3195369/
https://pubmed.ncbi.nlm.nih.gov/27071971/
https://www.ncbi.nlm.nih.gov/pmc/articles/PMC5492028/
https://pubmed.ncbi.nlm.nih.gov/24853887/
https://www.ncbi.nlm.nih.gov/pmc/articles/PMC2373379/
https://www.worldatlarge.news/function-health/linoleic-acid-as-driver-of-heart-chronic-disease

Coconut Thai Curry Chicken
Delicious stick-to-your-ribs meal for a chilly day!

This high-protein meal is perfect for a chilly fall day. It can be modified to be protein-sparing by using light coconut milk. Enjoy!
Ingredients:
4 boneless, skinless chicken breasts, cut into bite-sized chunks
1 T coconut oil or butter
1 can organic coconut milk with no gums - I like Native Forest
1 C bone broth
2 C chopped carrots
1 t fish sauce
1 T wheat-free tamari or Braggs coconut aminos
1 t garlic powder
1-inch piece of ginger, peeled and minced, or 1 t ground ginger
1 t onion powder
1 t ceylon cinnamon
1/2 t turmeric powder (optional)
1 T dried cilantro leaves (not coriander seed)
1 t fish sauce (gluten free)
1 T dried Thai basil
Directions:
Heat a large cast iron pan on medium-high. Add the coconut oil or butter, chicken breast chunks, tamari or aminos, and ginger. Stir-fry until chicken is cooked through and onion is soft. Add all other ingredients and stir well. Simmer until the carrots are soft, about 20-25 minutes and serve.

Coconut Curry Shrimp
This is a fun and quick weeknight dinner, super flavorful and colorful. You can use full-fat coconut milk if you’re at your goal weight, or light coconut milk on a weight-loss protein-sparing day. Other kinds of seafood can be substituted for the shrimp, like fish, scallops, clams, or calamari. Enjoy! Serves 2.
Ingredients:
Shrimp:
2 pounds of medium shrimp
1 T coconut oil
dash sea salt
Sauce:
1 can coconut milk, no gums - I like Native Forest
1 T fish sauce
1 T tamari sauce
1 t garlic powder
dash onion powder
2 t minced fresh ginger or 1/2 t ginger powder
1/2 t ceylon cinnamon
1/2 t turmeric, optional
3 T chopped Thai basil, optional
lime slices for serving
Instructions:
Whisk all the sauce ingredients together in a small bowl and set aside. Heat up the coconut oil a large cast-iron/stainless steel/copper pan on high until hot. Add the shrimp and the dash of sea salt, stirring constantly with a wooden spoon until the shrimp are pink and cooked through, a couple minutes. Pour in the sauce. Stir until hot and well combined, and remove from heat. Add more fish sauce and/or tamari to taste, for saltiness. Sprinkle herbs on top. Serve immediately with limes on the side.

Perfect Boiled Eggs
I’ve recently fallen in love with boiled eggs. They are perfect for protein-sparing days because they don’t need to be cooked with butter or other fat in the pan like with omelets, scrambed eggs, and fried eggs. All you get is the super-healthy fat in the yolk, which is 4.5 grams/egg. And with 6 grams of super high-quality protein each, they are super filling, delicious, and done in minutes! This recipe is choose-your-own-adventure, depending on whether you prefer your yolks runny, medium, or hard! Enjoy!
Ingredients:
Fresh eggs, soy- and corn-free (how many depends on the size of your pan: not more than will fit in one layer in the bottom of your pan, with some space around them)
Instructions:
1. Boil 3 inches of water in a medium sauce pan, being sure it’s not more than half full so there is room for your eggs after the water boils.
2. Lower fresh cold eggs into the rolling boiling water with a large spoon so they don’t crack on the bottom of the pan. Work quickly so that they don’t start cooking much before you get the timer set. Keep heat on high.
3. Set the timer immediately. Runny yolks = 7 minutes. Medium yolks (my fave) = 8 minutes. Hard yolks = 10 minutes.
4. When the water comes back to a roiling boil, lower the heat to medium, making sure that there are still simmer-bubbles in the water.
5. When the timer goes off, immediately pour out most of the hot water and add cold tap water to fill the sauce pan. Dump that water and fill it again with cold tap water to stop the cooking.
6. Peel, season with sea salt and pepper, and eat warm! Leftovers can be stored in the shell in the fridge for up to one week and eaten cold.
image: Photo by Anton Nazaretian on Unsplash

Salmon Greek Salad
This is one of my favorite salads ever. You can really use any kind of meat or fish you want but I love it with grilled or sauteed salmon. Serves 4.
Ingredients:
4 large wild-caught salmon fillets, 6-8 oz. each
1 tablespoon grass-fed butter
8 eggs
4 C zucchini noodles (or thin slice)
1/2 C kalamata olives
1/2 C feta cheese
2 C chopped cucumber
1/8 C super high-quality extra virgin olive oil
1/4 C balsamic vinegar
Sea salt and pepper, to taste
1 t each dried oregano, parsley, and dill
Optional: a few cherry tomatoes, if you tolerate nightshades (not recommended)
Directions:
Salt the salmon fillets and fry them in a hot buttered cast iron pan for a couple minutes on each side, so they are still rare in the middle. For the soft-boiled eggs, start with boiling a few inches of water in a medium pan until there is a roiling boil. Lower the eggs into the boiling water with a large spoon and immediately set a timer to simmer for 8 minutes. After the timer goes off, pour out the simmering water and fill with cold tap water to stop them from cooking. Peal and quarter the eggs. Plate the zucchini, cucumber, salmon, feta, eggs, and olives. Drizzle the dish with o.o. (olive oil), balsamic, herbs, and sea salt. Yum!

Beef Larb Salad

These are fun, easy, and absolutely delicious. Even my kids will eat them - in fact, they gobble them up! Double or triple the recipe for more than one hungry person.
Beef Larb Salad:
Ingredients:
1 pound ground beef
1 t sea salt
1 t garlic powder
1 t ginger powder
2 scallions (green onions), sliced, both white and green parts
juice and zest of one large lime
2 T fish sauce
2 T low sodium/ wheat-free tamari OR Braggs liquid aminos
2 T rice vinegar
1/2 Cup chopped fresh cilantro, mint, and basil (thai basil or regular)
For serving: julienned English cucumber (skinny cucumber with thin skin, wrapped in plastic).
Directions:
Brown the beef in a cast-iron pan with the ginger, garlic, and sea salt until cooked through. Turn the heat down and stir in the sliced scallions, tamari, fish sauce, rice vinegar, and lime juice and zest, and warm through. Sprinkle some of the herbs on top to serve, and plate the remaining herbs, and cucumber on the side. Serve the beef larb in bowls, topped with cucumbers and herbs, and enjoy!

Chicken Kebabs with Lemon-Yogurt Sauce
A delicious summer meal on the grill for a small dinner party.
I grilled these up for some friends last night, and multiple people told me it was the best meal they’d had in months. The kebabs and yogurt sauce can be made in advance, so all you have to do is grill them up and serve!
Kebabs:
4 pounds boneless skinless chicken breast, cut into 40 2-inch chunks
2 sweet potatoes, cut into large slices
4 zucchinis, cut into large chunks
1 pineapple, cut into large chunks
Marinade:
1 Cup sour cream
1 t garlic powder
2 Tablespoons Herb de Provence, dried (or 4 Tablespoons fresh herbs)
zest and juice from 2 lemons
1 Tablespoon sea salt
Yogurt Sauce:
3 Cups Plain Greek yogurt
juice of 1 lemon
1 t garlic powder
salt to taste
1 onion powder
Optional sides:
Mixed Greek olives, pitted
feta cheese, crumbled
Instructions:
Whisk the marinade ingredients in a small bowl and pour 2/3 of it over the chicken to marinade for 30 minutes. Also soak the wooden kebab sticks in water for 30 minutues so they don’t catch fire on the grill.
The other 1/3 of the marinade can be poured over the “veggies” after the kebabs are prepared. I like to position the potato and chicken toward the middle of the kebab since the middle of the grill is often the hottest and these parts need to cook more.
To prepare the yogurt sauce, combine all ingredients in a medium bowl and whisk. Serve the yogurt sauce as a dip for the kebabs, with feta cheese and olives sprinkled on top! Enjoy!
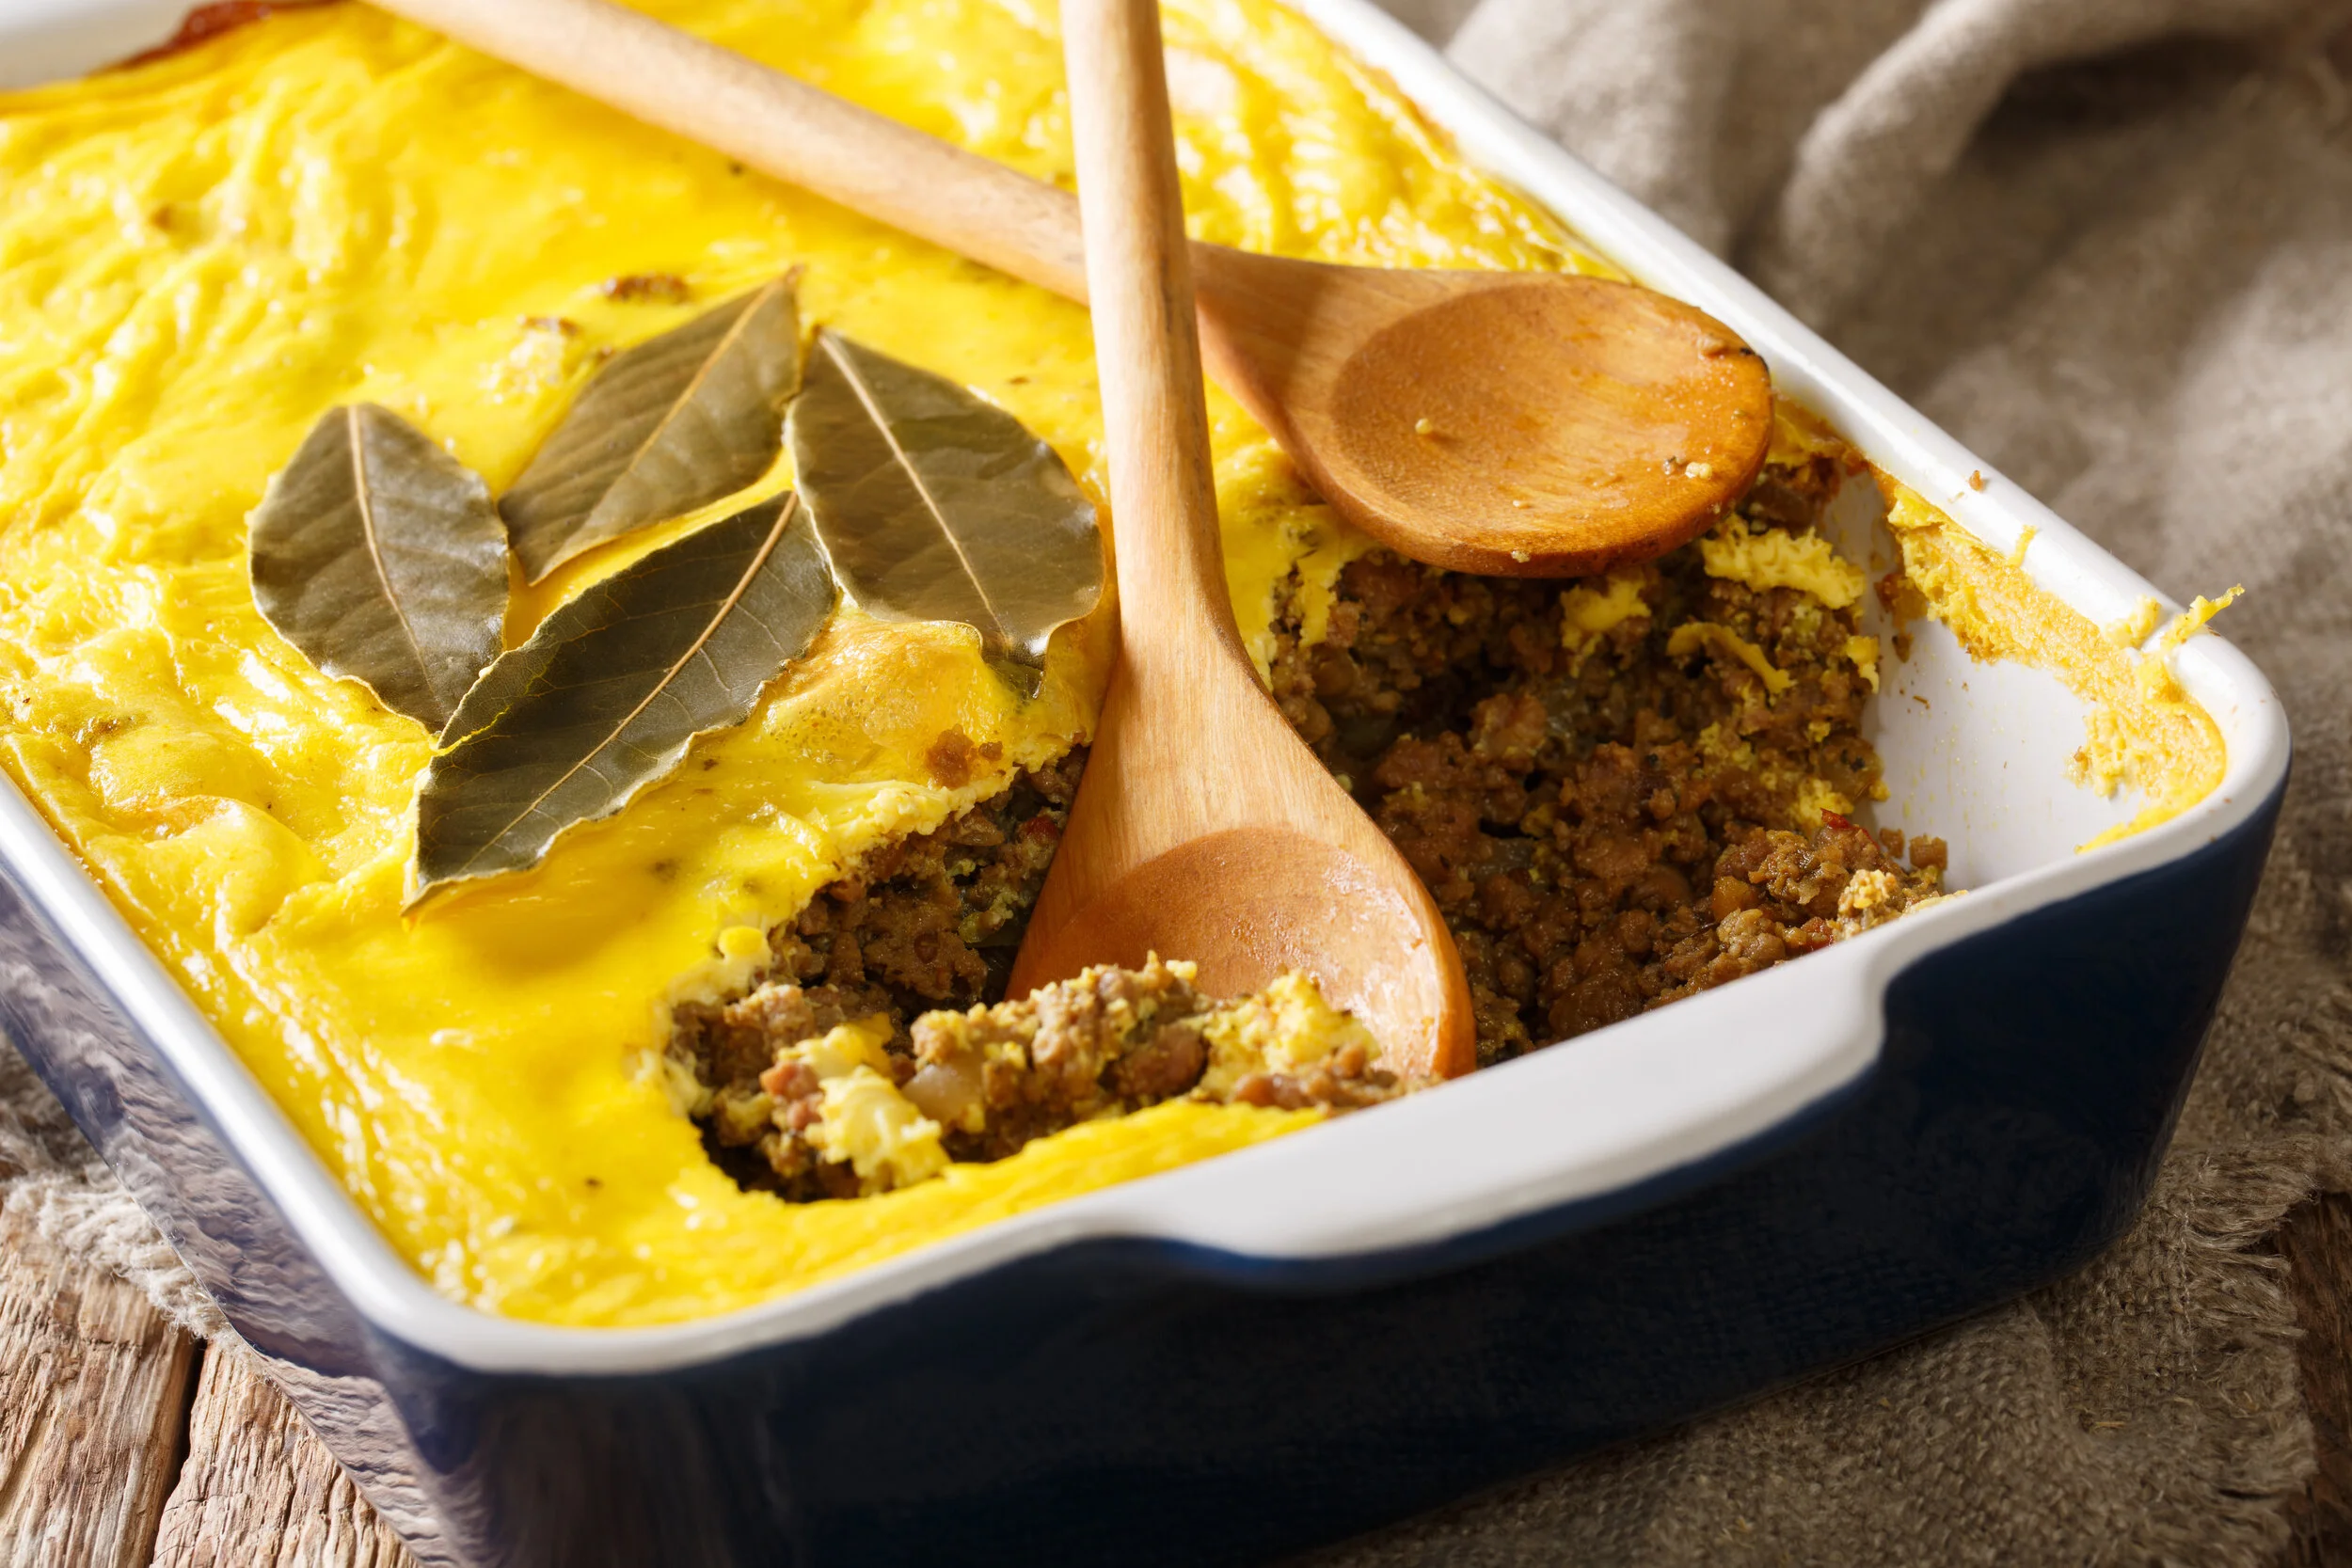
Bobotie (Curry Beef Custard)
A unique South Africa dish that is easy and delicious!
This is one of my favorite dishes. Its from South Africa and is quite popular there. It’s a unique combination of flavors, but it’s magical how they all come together. It’s also easy enough for a quite and hearty weeknight dinner. Sometimes it is dressed up for weekends or holidays by cooking it in a hollowed-out pumpkin!
Ingredients:
2 pounds ground beef, preferably grass-fed
1 T beef tallow or butter
2 t sea salt
2 T nightshade-free curry powder (2 t ceylon cinnamon, 2 t turmeric, 2 t ground ginger)
2 t garlic powder
1 t onion powder
8 eggs
1 can coconut milk or 2 C raw milk
1/4 C raisins
1/4 C chopped apricots
2 apples, peeled, cored and chopped
Optional: 5 bay leaves
Preheat oven to 350. Saute ground beef, tallow or butter, and salt, and break it up until well cooked. Add all spices and turn off the heat. It should be a little too salty at this point, as the custard will absorb the saltiness. Combine eggs and milk/coconut milk with an immersion blender or regular blender until well mixed, and pour it into the beef/spice mixture. Stir well, adding the raisins, apricots, and chopped apple. Lay the bay leaves on top in a decorative pattern. Bake (in a cast iron pan, dutch oven, glass baking dish, or hollowed pumpkin!) in the oven for 20 minutes or until a knife comes out clean. Do not overcook. Serve warm.

Taco Meat for Burrito Bowls
Taco Tuesday! Pile on top of shredded lettuce with your toppings of choice: sour cream, shredded cheese, diced avocado, cucumber, olives, and lime juice.
Ingredients
Per pound ground beef: (I like to make 1 pound per person and there will likely be leftovers)
1 teaspoon paprika, if tolerated
1/2 teaspoon ground cumin, if tolerated
1 teaspoon garlic powder
1/2 teaspoon onion powder
1/2 teaspoon dried oregano
1/2 - 1 teaspoon sea salt
Instructions:
Brown the ground beef in a cast iron skillet with a teaspoon of bacon fat per pound of beef. When it’s cooked halfway through, add the seasonings and stir well, breaking up the beef and salting to taste.
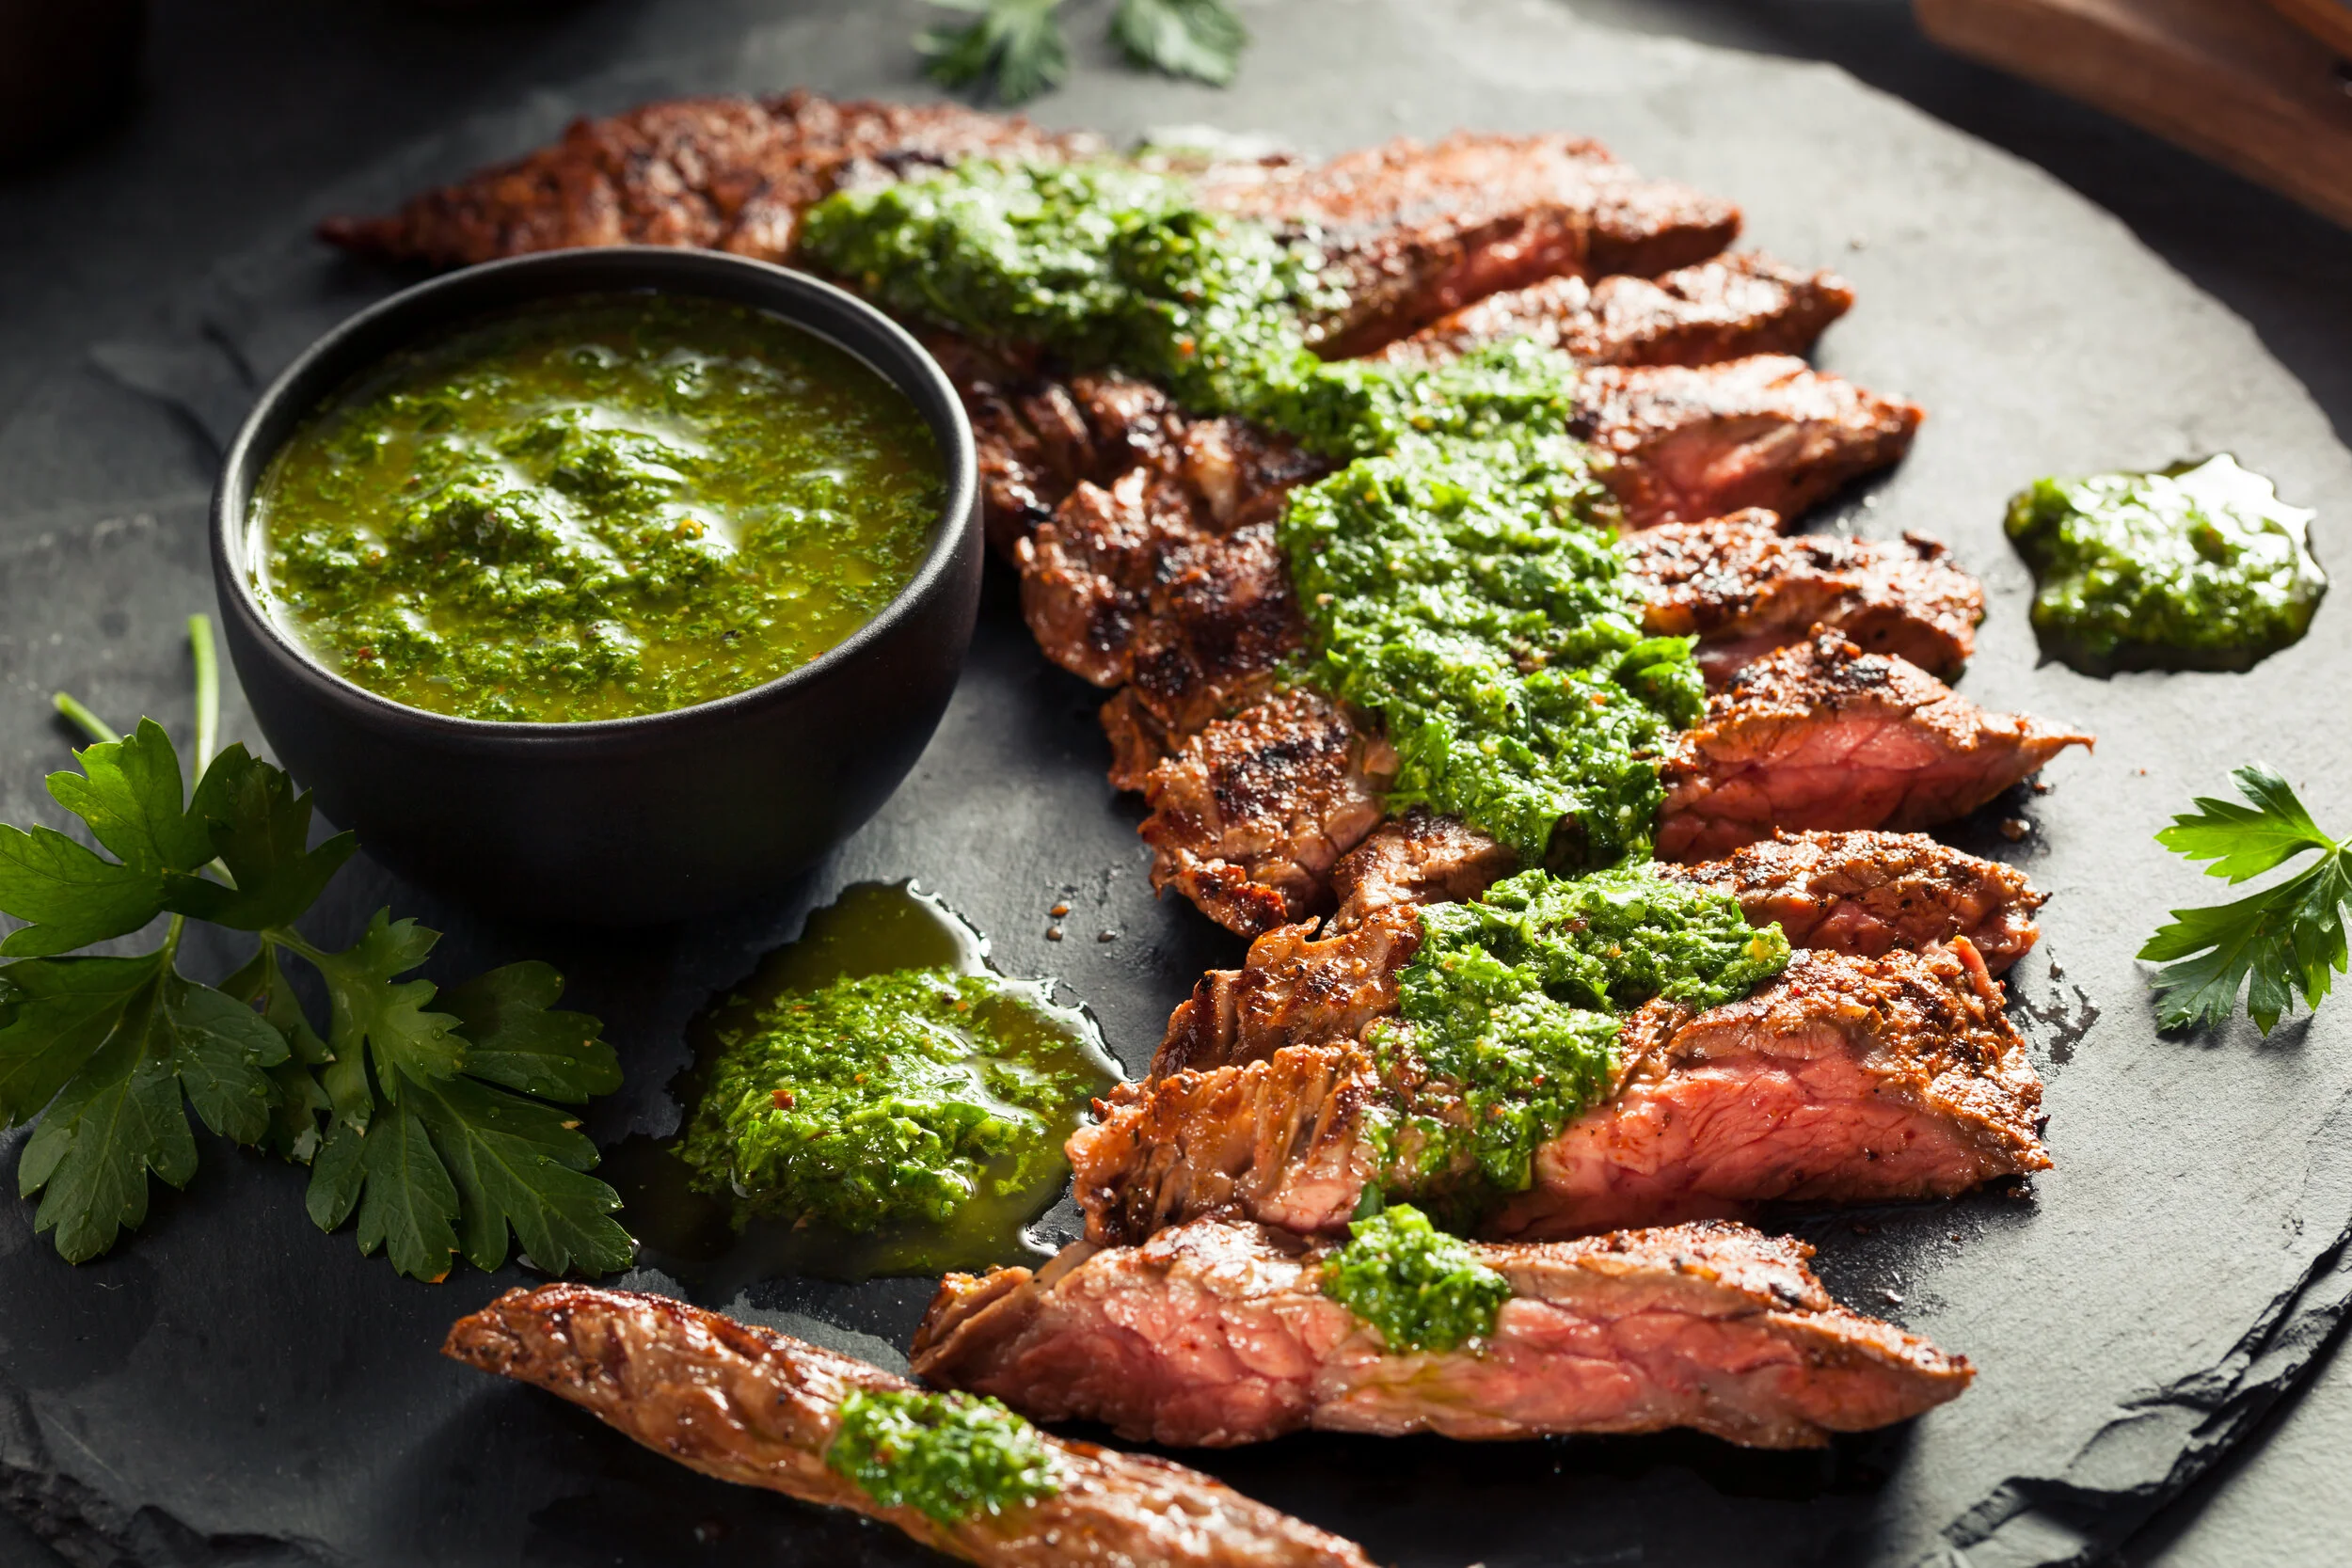
Chimichurri
The second best topping for steak, after herb garlic butter. Especially good on flank steak.
Next to herb garlic butter, this is my favorite topping for steak. I like to double the raw garlic and cayenne if I feel a cold coming on, but then my kids think it’s too spicy and won’t eat it. Although, that just leaves more for me!
Ingredients:
I large bunch fresh flat-leaf parsley, stems removed
1 large bunch fresh cilantro, stems removed
juice of one lime
2 T red wine vinegar
2 T finely chopped oregano
dash cayenne
dash cumin
sea salt and pepper
1/2 C melted butter
Directions:
Place all ingredients except olive oil into a food processor. If you don’t have one, an immersion blender works or you can fine chop the herbs and stir in all other ingredients. While machine is running, drizzle in the melted butter in a thin stream to emulsify. Add more salt and pepper to taste.

Egg Custard
Easy, delicious, and can be low-carb and protein-sparing for weight loss days.
A super easy and delicious dessert. Can also be made into a pie, using an coconut flour crust and topped with whipped cream.
Ingredients:
4 eggs
2 C heavy whipping cream, half and half, OR milk
1/3 C raw honey OR 30 drops Nunaturals liquid vanilla stevia
pinch salt
couple dashes of nutmeg, preferably fresh ground
Directions:
Preheat oven to 350 degrees. Mix all ingredients using a whisk or immersion blender. Pour into custard cups placed into a glass baking dish and add warm water to fill the baking dish halfway, this is called a “bain marie” or water bath, and helps the eggs to cook slowly and not scramble. Bake in the oven for 15-20 minutes or until a toothpick comes out clean.

🍓 Creamy Panna Cotta with Fresh Berries
My favorite low-carb dessert.
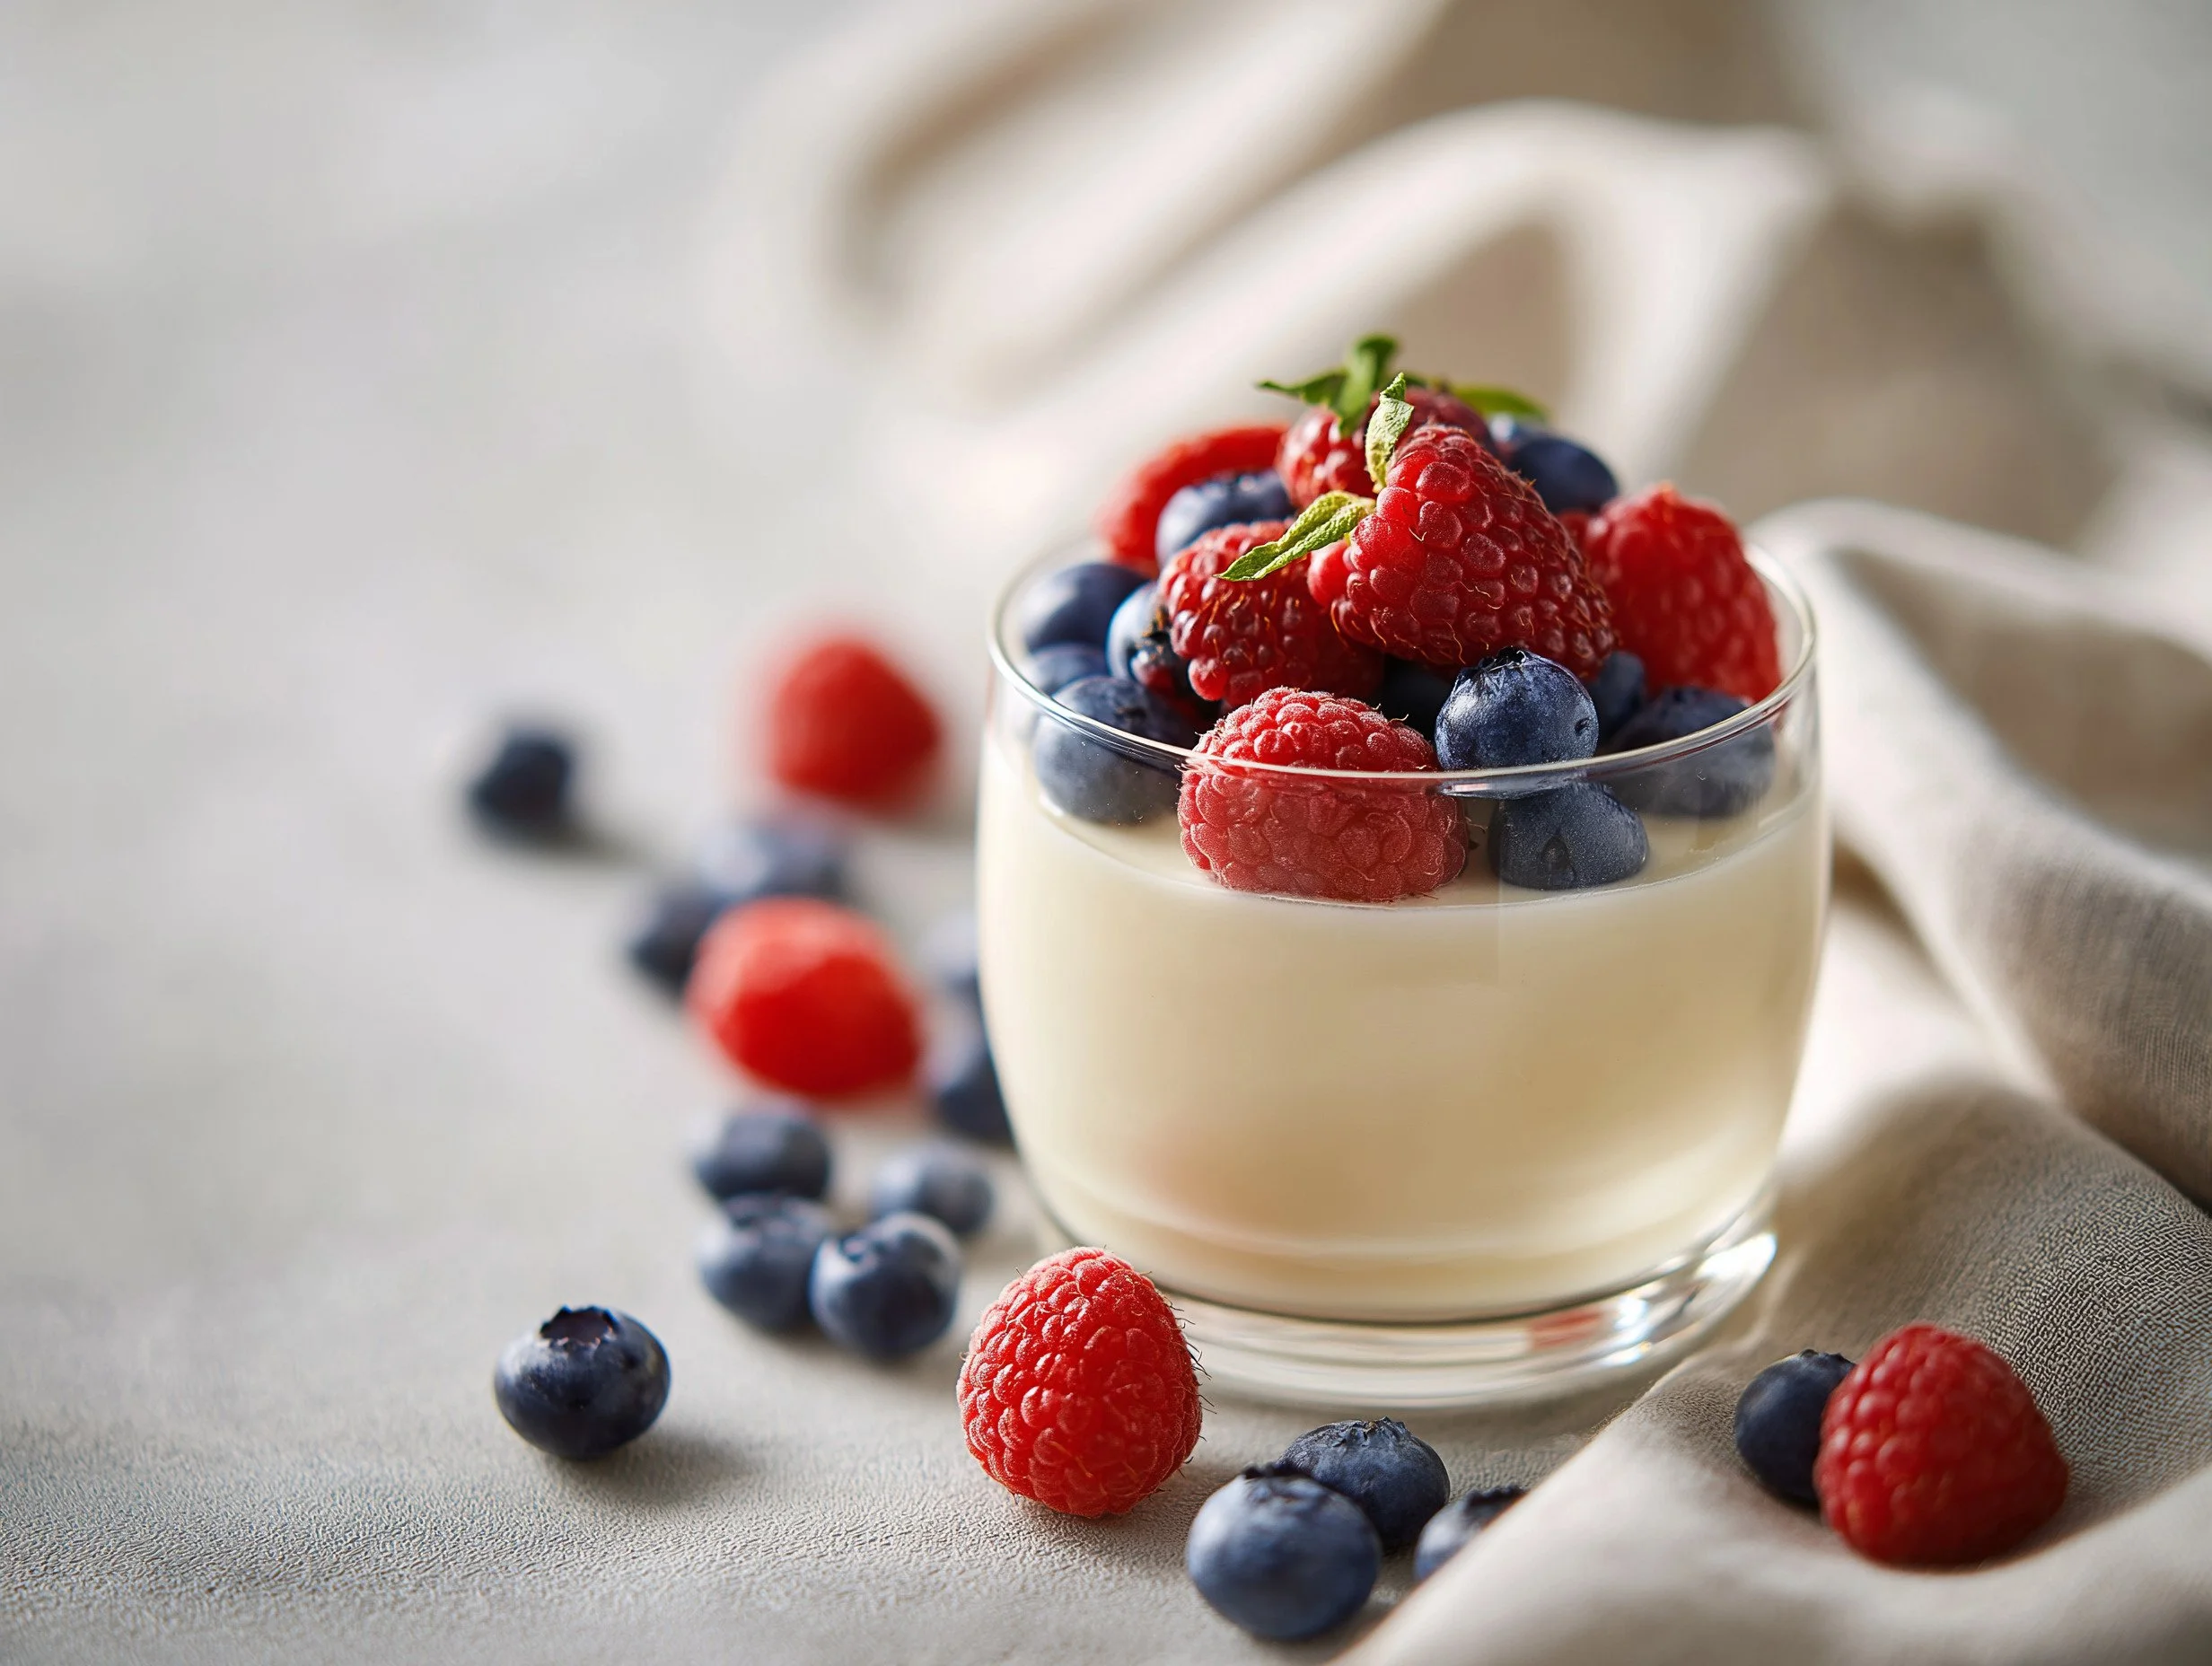
Light, luscious, and melt-in-your-mouth dreamy.
This might be my all-time favorite dessert. It’s simple, elegant, and deeply satisfying. Gently sweetened with honey or maple, infused with vanilla, and topped with juicy, fresh berries, this gelled milk dessert delivers all the indulgence with none of the heaviness. Think: protein + calcium + collagen support wrapped up in a summer treat. ☀️
Perfect for warm days, easy on digestion, and totally pro-metabolic.
✨ Ingredients (Serves 4):
2 cups skimmed raw milk (or any high-quality milk you tolerate)
1 packet unflavored powdered gelatin (about 2 ½ tsp)
3 Tbsp honey or 5 Tbsp maple syrup
½ tsp vanilla extract
Pinch of salt
1 cup fresh berries – raspberries or sliced strawberries are divine
🥄 Directions:
Bloom the gelatin: Pour 1 cup of the milk into a small saucepan. Sprinkle the gelatin evenly over the surface and let it sit for 3–5 minutes to hydrate.
Warm and dissolve: Add honey or maple, vanilla, and salt. Stir gently over medium heat until the mixture is steaming (but not boiling) and the gelatin is fully dissolved.
Add cold milk: Remove from heat and stir in the second cup of cold milk to cool the mixture down.
Chill and set: Pour into custard cups, ramekins, or wine glasses. Chill in the fridge until set—about 1 to 2 hours.
Top and serve: Spoon fresh berries on top right before serving. Optional: drizzle with extra honey for shine and sweetness.
🌿 Tips & Variations:
Want a creamier version? Swap half the milk for raw cream or use whole milk.
Add lemon zest or lavender to the milk while heating for an herbal twist.
This pairs beautifully with herbal tea or a small square of dark chocolate for a dreamy after-dinner moment.

The Sinus Infection That Wouldn’t Quit — Until Vitamin D Stepped In
Why should we take vitamin D, and how much?

I don’t get sick often, but when I do, it used to almost always be sinus-related. And it’s almost always winter. This time wasn’t especially painful—just relentless. I tried everything: antifungals, antibacterials, herbal remedies… nothing worked. A full month went by, and I still wasn’t better.
Then I came across an article by one of my favorite bloggers at the time discussing the role of vitamin D in viral immunity. My kids had just had short-lived flu-like symptoms when my sinus problems started—suspicious timing. I began to wonder: what if this wasn’t bacterial or fungal, but viral?
That’s when I discovered the Vitamin D Hammer protocol. I tried it—and within 24 hours, I felt significantly better. Within a few days, I was completely well. After weeks of frustration, it felt almost magical.
What Is the “Vitamin D Hammer”?
The Vitamin D Hammer is a high-dose, short-term protocol used to support the immune system during viral infections—especially in adults who haven’t been supplementing regularly. It typically involves:
50,000 IU in a single day, or
10,000 IU three times daily for 2–3 days
This far exceeds the FDA’s outdated recommendation of 400 IU/day. Research shows it takes ~9,000 IU/day for 97.5% of adults to achieve just 50 nmol/L serum levels—considered the bare minimum for sufficiency. Many experts now recommend 75–100 nmol/L, especially during illness.
Why It Works: Vitamin D as an Immune Modulator
Vitamin D is actually a hormone made in the skin in response to UVB light. It’s a powerful immune regulator that:
Enhances macrophage function (white blood cells that engulf pathogens)
Increases the oxidative burst needed to kill viruses
Reduces pro-inflammatory cytokines that can worsen symptoms
Protects against respiratory infections, especially in the winter
One landmark study found that vitamin D supplementation virtually eliminated seasonal influenza in children, with just one case reported in the group receiving 1,200 IU daily during winter months—compared to 31 cases in the control group.⁽¹⁾
Researchers who coined the “Vitamin D Hammer” reported:
“The results are dramatic, with complete resolution of symptoms in 48 to 72 hours. One-time doses of vitamin D at this level have been used safely and have never been shown to be toxic. The cost is less than a dollar.”
Why You Get Sicker in Winter
Flu season isn’t a coincidence. It’s a sunlight problem. In colder months, UVB exposure drops—and so does vitamin D production. That’s when respiratory viruses thrive.
Influenza symptoms were worse in lab subjects exposed in winter
Children with vitamin D deficiency had more frequent colds
Activated vitamin D is critical for turning on antiviral defenses
Beyond Viruses: Vitamin D & Chronic Disease
Once I started digging into the research, I was shocked at how many conditions are linked to low vitamin D:
Autoimmune disease (MS, RA): up to 40% lower risk
Diabetes (type 1 & 2): improved insulin sensitivity
Muscle weakness & falls in the elderly: 20–72% reduction
Back pain, fibromyalgia, low energy: all linked to deficiency
Cardiovascular health: lowers blood pressure and heart rate
Cancer: shown to trigger apoptosis in some tumor cells
Can You Get Enough from Food?
Not really. While vitamin D is found in:
Egg yolks
Salmon and cod liver oil
Beef liver and cheese
…the amounts are too small to make a real dent. Food alone won’t get you to the 9,000 IU/day threshold needed for sufficiency—especially in winter. I now supplement with 5,000-10,000 IU gel caps daily, and go higher if I’m fighting something off.
If possible, test your levels and aim for 60–100 nmol/L (30–40 ng/mL) for optimal immune support.
Summary
I kicked a month-long sinus infection in days using the Vitamin D Hammer. Turns out, most of us are deficient—especially in winter—and vitamin D is essential for fighting viruses, regulating immunity, and preventing chronic disease. Food isn’t enough. Test your levels, and don’t be afraid of higher doses when you need them.
Read the Research
(1) Urashima M, et al. Randomized trial of vitamin D supplementation to prevent seasonal influenza A in schoolchildren. Am J Clin Nutr. 2010;91(5):1255-60. PMC2861286

Keto Sushi Handrolls
A delicious and nutritious take on sushi, with almost no carbs.
This is one of my favorite meals. Adding seafood to our diets is essential, and I highly recommend wild caught seafood whenever possible to minimize toxins and maximize nutrients. Seafood has long-chain fats that cannot be found in any other food, including DHA and EPA, and is also rich in omega-3 fatty acids, vitamins D and B2 (riboflavin), as well as calcium, phosphorus, iron, zinc, iodine, magnesium, and potassium. Seaweed paper (called nori) is also highly nutritous, containing as much protein as some meat, as well as high levels of iodine, an essential mineral.
Keto Salmon Handrolls:
1 lb wild salmon, seasoned with ground ginger and soy sauce, and sauteed in butter until medium rare
a few ounces of salmon roe (fish eggs), optional
1 package nori (seaweed paper)
1 hothouse cucumber, julienned
1 carrot, grated fine, optional
1 red or yellow bell pepper, julienned
2 ripe avocados, julienned or sliced fine
4 scallions, sliced fine
one jar of pickled ginger
wasabi
tamari (gluten-free soy sauce)
Instructions:
Take a nori seaweed wrap and lay a slice of salmon down diagonally, adding your desired julienned vegetables and toppings, and roll up, pinching the bottom and adding roe, tamari, and wasabi to the top. Enjoy, with bites of ginger before and after!